Showing posts with label how to. Show all posts

Monday, December 3, 2012

Face Mapping and Nutmeg Dermabraison

Hello there. Winter is coming here. Though it doesn't really feel like it. For as much as I hate snow and winter, if it's going to be this cold and gloomy, it might as well snow. Might as well make it all pretty-like, you know? I'm tired of looking at the corpses of stray dead leaves over my lawn and being paranoid if my yard has gotten too unruly for the neighborhood. At least with a dusting of snow, it can look like a tiny vignette inside of a snow globe and I'll just bitch about the finger-biting cold and not about the finger-biting cold and the drab scenery.

Anyway, rant aside, I wanted to discuss the other fun part of winter: dry skin. My skin pretty much feels like all the moisture has been zapped out of it. My face especially. It's look ashy, a bit puffy, and I'm finding flaky dry spots here and there. Pimples have come out full force all across my forehead so I'm going to have to figure out what to do there. 

By the way, is anyone familiar with the acne face map? It is believed in Chinese medicine that the location of acne on your face is related to various imbalances and upsets in your body and health. I've always known that acne on the jawline is related to hormonal changes, but finding it on my forehead and between my eyes is definitely new. According to this acne face map: for acne between my eyes: I either have a weak heart, I'm drinking too much alcohol, or smoking too much tobacco. Since I don't smoke and I'm pretty sure my heart's going strong, I guess wine might be the culprit. For acne on my forehead: I could be having digestive problems (yep,) small intestine issues, liver issues, irregular sleep schedule (double yep,) too much worrying (triple yep,) too much sugary foods (quadruple yep,) toxin build-up, hair products, bangs, and wearing dirty hats. 

I'm a strong believer that stress and other mental incapacities have a direct effect on one's body and health. For years, I've experienced terrible migraine-like headaches that only grew worse as time went on. I took medicine, went to the doctor, got testing and was concluded that I may or may not have tumor in my pituitary gland. Fun stuff, right? When things in my life changed and I was placed in a situation away from certain people and things that were stressing me out, my headaches melted away. It was pretty close to miraculous. 

So aside from using natural products to wash my face and care for my skin, I really need to ramp down my stress level, quit eating so much sugar (I'm so stressed, cookies look so damn good to me right now,) and reduce the amount of wine I'm drinking. I will also be doing this:

Nutmeg Microdermabrasion Scrub

1 tbsp whole milk (or hemp milk, almond milk, rice milk, but not soy unless it is GMO-free)
1/2 tbsp nutmeg (ground or freshly ground if you can do it)

Mix together well in a little bowl. With clean, dry hands, and preferably a clean face, scoop the mixture up and massage it in little circles on your face. Try to use an upward motion to counteract all that gravity does. Leave on for 2 to 10 minutes depending on whatever floats your boat. Then, rinse well. Moisturize if needed.

Why nutmeg and milk? Nutmeg is similar to honey that it has antibacterial and anti-inflammatory properties which makes it good for oily skin and acne. It's also nourishing which helps dry skin by removing the top dry skin layer and nourishing the new layer beneath. Milk has lactic acid that works as a gentle peel for dead skin that refused to be removed as well as moisturizing benefits. It makes your skin baby-butt soft and helps replenish some of the lost moisture in your skin. So really, this is a great scrub for all skin types.

For some people, they say they feel a burning sensation when they use it. I didn't feel it at all. However, if you do feel it, it's not a bad thing but just leave it in for much less time, obviously. Rinse it right away or just do a minute if it's not burning badly. Do not use cinnamon as it will burn. 

My skin was still a little tight and dry afterwards, but it's just because my skin gets really dry once winter comes around. It was definitely extremely soft. I'm going to try this again with heavy cream to amp up the moisturizing benefits so check back to see my experiences with heavy cream.

Like all scrubs, resist the desire to use it everyday. Just try to keep it to once a week to prevent any irritation. Also, you will experience the desire to bake a pumpkin pie. I don't recommend resisting that desire.

Special thanks to Crunchy Betty for the idea.

Tuesday, August 21, 2012

Tiger Pose Chaturanga

I'm sad to say that I've been slacking on my yoga. Guitar Boy and I have been going on bike rides instead. The weather has been so lovely; it's hard to compare an hour indoors doing yoga with an hour (or more) outdoors biking and enjoying the beautiful Towpath. Yesterday, we managed to go 30 miles, much to my dismay because we were utterly wholly unprepared and were practically starving and shaking with hunger by the end of the ride. Next time, granola bars. Yep.

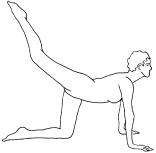
However, when I'm watching TV while winding down at night, I'll do a couple yoga poses during the commercials. Sometimes, I'll do a few quick Sun Salutations, other times, I'll do some twists and seated stretches. Yet other times, I'll do this modified Tiger Stretch I've seen in some yoga sessions but can't find the official name for it. I consider it a sort of Tiger Stretch chaturanga. Chaturangas are an important part of Sun Salutations. It's a yoga push up. What fun!

This modified Tiger Stretch is a vinyasa that includes an Extended Cat Stretch and a yoga push up, finishing with the Tiger Stretch. It's a great way to stretch out your spine and neck. It also strengthens your arms, most specifically your triceps, and it helps build your core. It's incredibly energizing. After I finish my sequence, my muscles are loose and renewed and I feel relaxed.

1. You begin in tabletop pose, (remember from the Cat-Cow Pose.) Stand on your hand and knees, your wrists below your shoulders and your knees below your hips. Keep your back and neck flat and straight and relax your jaw.


2. Then, shift your weight so it centers over your right knee. Inhale and slowly lift and stretch out your left leg. Reach it up while arching your back, lowering your belly down towards the floor, and looking up. This is the Extended Cat Pose.


3. Exhale, with your leg still lifted, soften your back slightly and begin to lower into the push up. Slowly, by bending your elbows back towards your hips, not out to the side, lower your chest to the floor in a mini push up. You will now look like a diagonal line with your leg in the air and your chest close to the ground.

4. Inhale, and slowly push yourself back up into the Extended Cat Pose in number 2.

5. Now, exhale and release your leg. Raise your back, bend your knee as you release the leg and bring it under your body close to your forehead. Lower your head to meet it and stretch your spine in the opposite way from the Extended Cat Pose. This is the Tiger Stretch.


6. Come back to the Extended Cat Pose and repeat 2 through 5 two more times on the same leg. Then, return to the table top pose.

7. Repeat the sequence three times on the opposite leg making sure to center your weight on your left knee first before raising your right leg. 

I do this three times on each leg then move into the Child's pose to relax for a minute. If you don't think you can manage the chaturanga, the push up, you can simply skip steps 3 and 4 and go straight into number 5. Do give it a chance though, you might find it a bit enjoyable!


Note: I am not a doctor or any type of medical/physical professional. My advice is given because it works for me, not because a doctor or professional said so. If you have any questions about your physical ability, please check with your doctor or physician first for all matters.  

Photo image source

Wednesday, August 8, 2012

Pieczenia Proziaki: Polish Soda Bread

Pieczenia proziaki is Polish bread made with baking soda rather than yeast. As a result, it's really quick and easy to make with just a very light amount of kneading. It's not even worth getting out the electric mixture for this, it's that simple.


Strangely enough, even though my parents immigrated from Poland, they've never made this when I was growing up. They know of it but not the recipe. It took some stealthy research to come up with one; that and some frequent testing. Though there are several ways to present it, I chose to make the round loaf as opposed to the small round flat breads just because the only directions I could find for it were way too vague. Sadly, I don't speak or read Polish. It's something my mom has berated me forever about though I think it's my parents' fault for not teaching me. Gotta love that old-fashioned Catholic guilt.

Alas, that's the joy of being your parent's child, right? 

Like all breads, it requires your touch and judgement to know the correct proportions. Here are the basic measurements of the ingredients, but as you'll see in the directions, you may need more or less of an ingredient to come out to the same result. You know, bread is like that, but don't let it deter you because this is pretty forgiving no matter what you do.

 Pieczenia Proziaki- Makes one 6" loaf

Gather up:
  • 1 1/2 cup all-purpose flour (I use whole wheat)
  • 1/2 tsp baking soda
  • 1/2 tsp salt
  • 1/2 to 1 cup sour cream
  • 1 tsp honey (or sweetener of your choice: sugar, agave nectar, etc.)
Now, make it:
  • Preheat oven to 425 degrees, prepare a kneading surface by dusting with flour, and prepare a baking pan by dusting with flour as well
  • In a large bowl, sift or whisk together the flour, baking soda, and salt. (I just whisk with a fork.)
  • Create a well in the center of the flour and pour in the sour cream starting with 1/2 cup and honey
  • Using a wooden spatula, slowly mix flour into the sour cream. If it looks a little dry, add a little more sour cream.
  • Once the dough is coming together with about 1/3 to 1/4 of dry flour still loose, dump the dough and flour over the kneading surface and begin to knead gently. Use a light hand and move quickly because unlike yeast, the baking soda can cause the gluten in bread to tighten up too fast and make it tough.
  • Knead to achieve a slightly sticky but elastic dough. You don't want it to be leaving bits of dough on the surface because it's so sticky, but you don't want it to be completely dry. You may need to add more sour cream or more flour as you knead or you may already have the perfect consistency without adding either. (I've been known to use nearly a whole tub of sour cream with good results if that makes you feel better.)
  • Shape into a ball gently and place onto the baking pan. Using a sharp knife, make an X into the surface quickly and decisively. Then, dust the surface with more flour.
  • Bake for 30-40 minutes until golden and the crust is firm. It will sound hollow when tapped. My method is to use two towels to flip the loaf upside down in one hand and to tap the bottom. If it sounds hollow, it's done.
  • Let cool on a rack immediately. 
  • Serve with butter and salted radish slices because well, it's Polish.

Here's why it's forgiving. If you use too much sour cream, it's okay because it'll still taste good. The slices will be extremely moist and a bit crumbly so use this as a bread for soup and stew. We still use it to make peanut butter toast regardless. If you had more flour than sour cream, you'll have firmer slices that can be toasted and topped with your favorite spread. First, just experiment the way you like then go from there. Don't try to aim for a firm or soft bread on your first try. Test it out as is.

If you don't want to use sour cream, you can use whole yogurt, greek yogurt, or even one of those Activia yogurt drinks in a pinch (been there, done that.) Buttermilk and kefir works as well. Here's why regular milk won't work. The fermented dairy has the acid that baking soda needs to help make the bread rise. I'm eager to try this with creme fraiche or mascarapone cheese for a sweet bread because, man, that sounds good. I would have to whip or soften them first so they can blend into the flour well.

This loaf is magical. Why? Because it pretty much disappears when I'm not looking, (glares at Guitar Boy.) He has been known to take enormous bites out of the loaf itself leaving me with weird crooked slices for my freaking peanut butter toast in the morning. (Glares again.) I really need to make several and freeze them next time. I bet you this can be easily doubled for a larger loaf. Just bake for a little longer.

Next time, I'm going to try and add some flax seeds or chopped herbs. Smacznego!

Wednesday, July 25, 2012

Natural Beauty Products: Why Should We Care?

People seem so aghast when I tell them I wash my face with honey and olive oil and wash my hair with baking soda and apple cider vinegar. It's actually fun. The most interesting part is seeing who is into it and who thinks I'm insane. It turns out that I'm always wrong on my estimation of their reaction. Someone who I thought was a diehard hippie scrunched up her face and say, "eeew." (image source)


No, no "eeew." Don't say that!

Here's the thing, this was my lightbulb moment. My sister came home last summer and told me she switched to natural products. You know, the super-expensive kind from health food stores that make you kind of want to cry. Why, when she could find a pretty good equivalent on the shelves of Target? She introduced me to something called the EWG's Skin Deep Cosmetic Database. It lists many commonly found products along with a rating. 0 for no harmful chemical, substance, or additive, all the way up to 10 which means it has an extremely high amount of harmful toxins. They go through every single unpronounceable ingredient in a product and explain why it's bad for you. Anything rated 0 - 2 is considered ideal. 3 - 6 is okay but it's pushing it. And 7 - 10 is pretty harmful.

That's all good. But why should we still care so much? We're not ingesting it. We're just putting it on our faces and skin. Ah, therein lies the rub. The skin is our body's largest organ. It's also, clearly, the most exposed and abused in a sense. It lies on the outside of our skeletal and muscular structures, keeping stuff like our intestines from falling out and protecting what's inside from outside effects. It is also porous. Technically, even though it's pretty darn water-resistant, it's not a like sturdy piece of plastic keeping out absolutely everything. It's a lot more like a very, very, very heavy-duty sponge.

So we may not be putting this stuff in our mouths, but we are still absolutely, certainly putting them into our bodies through our skin and hair. Imagine day after day of rubbing chemicals all over your skin, it's bound to have adverse reactions deep inside. Imagine rubbing this stuff on a baby's bum! Not to mention, most of these chemicals disrupt our skin cell's natural function. In fact, skin cells view these chemicals as the enemy and rally up to fight against them. Instead of your cells working along side the chemicals to heal your skin, they've turned it into a battlefield. That's why many people tend to experience redness, irritation, or even worsening acne whenever using a product. This is also why many people think they have sensitive skin when in actuality, a very small percentage of people truly have sensitive skin. It's all a result of what we rub on our face and body.

Think of retinol, commonly known as Retin-A. It's an extremely potent substance that is typically prescribed. It's the choice for eliminating acne and wrinkles. It works a lot like a mini chemical-peel by removing a layer of skin whenever you put it on. That's why the side effects include redness and irritation. Instead of letting the skin cells do what it does naturally- replenishing the layer and balancing oil production, it's getting all thrown out of whack because we're bombarding them with a ton of things they don't recognize or can't use. Also, you can't use it while pregnant. Think about that.

However, if you use a natural substance like honey or olive oil or even baking soda and apple cider vinegar, your skin is much more apt to recognize them and view them as friends rather than foes. Your skin biologically knows what it needs to do and adding natural aids just gives them that boost or a few extra "tools" they can actually use. Your body is a great system in itself. If it really needed a ton of weird chemicals and extra toxins to survive, we probably wouldn't have made it all these hundred of years ago.

Natural beauty products can be pricy which is the main reason why I turned to homemade recipes. So far, they have worked fabulously and I have no regrets. In fact, I just want to go tell the whole world they need to convert! However, not everyone has the time or inclination to make their own, but there are options. If you know what to look for, you're already taking a huge step towards improving your beauty care. 

Here's a list of common ingredients to avoid as much as possible. You can read a more in-depth overview on EWG's Skin Deep Top Tips for Safer Products.
  • Benzalkonium chloride: Biocide, preservative and surfactant associated with severe skin, eye, and respiratory irritation and allergies, benzalkonium chloride is a sensitizer especially dangerous for people with asthma or skin conditions like eczema.
  • BHA: The National Toxicology Program classifies butylated hydroxyanisole (BHA) as “reasonably anticipated to be a human carcinogen.” It can cause skin depigmentation. In animal studies, BHA produces liver damage and causes stomach cancers such as papillomas and carcinomas and interferes with normal reproductive system development and thyroid hormone levels.
  • DMDM hydantoin & bronopol (2-Bromo-2-nitropropane-1,3-diol): Cosmetics preservatives that decompose and release formaldehyde, which the International Agency on Research on Cancer lists as a known human carcinogen. The preservatives and their decomposition products, including formaldehyde, can trigger allergic reactions.
  • Formaldehyde: A potent preservative considered a known human carcinogen by the International Agency on Research on Cancer. Formaldehyde, also an asthmagen, neurotoxicant and developmental toxicant.
  • Fragrance: It may help sell products from face cream to laundry detergent, but do you know what’s in it? Fragrances are in everything from shampoo to deodorant to lotion. Federal law doesn’t require companies to list on product labels any of the chemicals in their fragrance mixture. Recent research from EWG and the Campaign for Safe Cosmetics found an average of 14 chemicals in 17 name brand fragrance products, none of them listed on the label. Fragrances can contain hormone disruptors and are among the top 5 allergens in the world. Our advice? Buy fragrance free.
  • Hydroquinone: A skin bleaching chemical that can cause a skin disease called ochronosis, with blue-black lesions that in the worst cases become permanent black caviar-size bumps. In animal studies, hydroquinone has caused tumor development
  • Methylisothiazolinone and methylchloroisothiazolinone: Preservatives, commonly used together in personal care products, among the most common irritants, sensitizers and causes of contact allergy Lab studies on mammalian brain cells suggest that methylisothiazolinone may be neurotoxic.
  • Oxybenzone: Sunscreen agent and ultraviolet light absorber, found in nearly all Americans, according to the U.S. Centers for Disease Control and Prevention. In human epidemiological studies, oxybenzone has been linked to irritation, sensitization and allergies.
  • Parabens (Propyl, Isopropyl, Butyl, and Isobutylparabens): Parabens are estrogen-mimicking preservatives, found in breast cancer tumors of 19 of 20 women studied. Longer chain parabens like propyl and butyl paraben and their branched counterparts, isopropyl and isobutylparabens, may disrupt the endocrine system and cause reproductive and developmental disorders.
  • PEG/Ceteareth/Polyethylene compounds: These synthetic chemicals are frequently contaminated with 1,4-dioxane, which the U.S. government considers a probably human carcinogen and which readily penetrates the skin. Cosmetics makers could easily remove 1,4-dioxane from ingredients, but tests documenting its common presence in products show that they often don’t.
  • Petroleum distillates: Petroleum-extracted cosmetics ingredients, commonly found in mascara. They may cause contact dermatitis and are often contaminated with cancer-causing impurities. They are produced in oil refineries at the same time as automobile fuel, heating oil and chemical feedstocks.
  • Phthalates: A growing number of studies link this chemical to male reproductive system disorders. Pregnant women should avoid nail polish containing dibutyl phathalate.
  • Resorcinol: Common ingredient in hair color and bleaching products; skin irritant, toxic to the immune system and frequent cause of hair dye allergy. In animal studies, resorcinol can disrupt normal thyroid function.
  • Retinyl palmitate and retinol (Vitamin A): Vitamin A is an essential nutrient, but excessive amounts can cause severe birth defects if women are exposed during pregnancy New evidence shows that when applied to sun-exposed skin, for instance, in sunscreens, lip products and daytime moisturizers, these compounds can break down and produce toxic free radicals that can damage DNA and cause skin cancer.
  • Triclosan & Triclocarban: Antimicrobial pesticides in liquid soap (triclosan) or soap bars (triclocarban), very toxic to the aquatic environment. often found as contaminants in people due to widespread use of antimicrobial cleaning products. Triclosan disrupts thyroid function and reproductive hormones. 
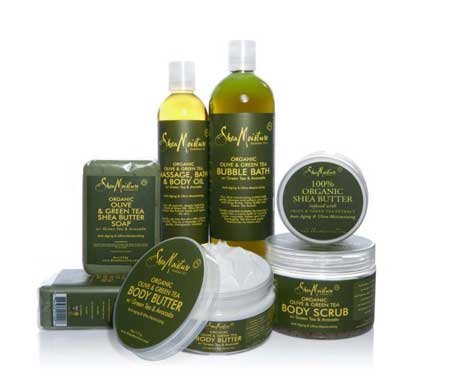
I know it's overwhelming. But thanks to growing education and demand among people, there are more and more products coming out without most of these harmful ingredients. My favorite product is Shea Moisture Olive Oil and Green Tea Lotion with Avocado. I splurged on it after a day in the sun and my skin was feeling sensitive and tight. It was the best decision I made. The entire Shea Moisture line is great and avoids many of these harmful toxins. You can find them at Walgreen's or Target or online. (image source)

If you made it all the way down here, thank you! I know it was long but I hope it was informative for you. If you did one thing to change your beauty routine to make it safer, you're making a huge difference already. It's one less harmful product being bought and one more good thing you can do for yourself. Between you and me, we can really help change the face of beauty care!

Friday, July 13, 2012

Center Yourself with Cat-Cow Yoga Vinyasa Poses

Vinyasa means synchronizing your movements to your breath. Inhale- move to one asana or pose, exhale- move to another. It's calming to your mind and relaxing to your body. When I'm going through a routine, breathing in and out, I just close my eyes and lose myself in my body. It has never failed to rejuvenate me.

The Cat-Cow sequence is a stress-relieving and emotionally balancing vinyasa routine. I do this whenever I have a free moment and want to stretch out my spine and center myself. Other benefits include: strengthening your spine and neck, stretching your lower torso (e.g. hips, belly, and back,) stimulating organs in your abdomen, and improving your overall balance and posture.

You begin in Tabletop pose. Stand on your hands and knees with your wrists and elbows directly below your shoulders and your knees directly below your hips. Stretch and space out your fingers so you feel very grounded through your hands. Point your toes back throughout the sequence. Keep your spine flat in a "neutral" position and relax and elongate your neck, looking at down at the floor. (image credit)

As you inhale, move into the Cow pose. Arch your back, lowering your belly towards the floor, and lifting your tailbone upwards while pressing your chest forward and up. Face towards the ceiling. Relax your shoulders from your ears. Try to do most of the movement in your upper back, allowing the rest of your body to follow suit. As always, keep your shoulders and jaw relaxed so you avoid tension and continue breathing. (image credit)


Then, when you exhale, move into the Cat pose seen below. Round your back upwards, allowing your chin to drop towards your chest- but do not force it. Let your head drop to the floor. Tuck in your tailbone and gaze towards your bellybutton. Keep your shoulders relaxed and in place as well as your hips. (image credit)

Continue to slowly and gently move into the Cow pose with each inhale, then the Cat pose with each exhale. Breathe deep into your lower lungs and belly. Try to extend your belly out as you breathe in, imagining it filling up with air, then pull your belly in as you exhale, as if you're deflating all the air out of it. Continue for 5 - 20 breaths depending on how long you want to do it then return to the neutral Tabletop pose to finish.

Don't worry if you're not getting the pose exactly right or if you're not following the deep belly breathing technique I described above. As long as you synchronize the inhales and exhales to the Cow and Cat poses and you feel a change in your body, you're doing yoga. Do not push yourself into poses, just breathe yourself into it and let your body relax and take over.

If you do yoga, what poses do you like to relax yourself when you have a minute in the day? If you don't do yoga, will you try this? If you do, how did you like it? You can answer in the comments below!

Note: I am not a doctor or any type of medical/physical professional. My advice is given because it works for me, not because a doctor or professional said so. If you have any questions about your physical ability, please check with your doctor or physician first for all matters. 

Wednesday, July 11, 2012

Wash Your Face with Honey, Sweetie

I've mentioned before in my Meet Beatrice video and Facebook that I've been washing my face with honey. Yes, I am secretly crunchy granola. Hear that sound? That's the sound of a stereotype being broken. Kaboom! But really. I like putting food on my face... and in my mouth... and that's where it ends so don't get too excited. 

And I like that if I accidentally lick my lips, I get a taste of yummy honey and not some chemical-laden cream that requires me to brush my teeth thoroughly. (image credit)


So if you're interested in trying out a honey wash, let me introduce you to my face washing routine. I first learned about the honey wash when I read Crunchy Betty's Honey Challenge post. It intrigued me because it seemed like a miracle wash. Here's a snippet from Crunchy Betty about the properties and benefits of washing your face with honey:
  1. It is antibacterial and antimicrobial. It will get off any lingering nastiness that’s thinking about setting up camp on your face and creating pimples.
  2. It is slightly drying which means it helps soak up any pimples or oiliness.
  3. It is also incredibly moisturizing. Seems like a double standard, doesn’t it? But it’s true. Honey sinks into your skin and moisturizes like you wouldn’t believe. (Remember Cleopatra and her honey baths to look young?)
  4. It imparts all kinds of beneficial enzymes that work at scrubbing your face for you, as well as perform a little anti-aging action.
  5. It’s great for acne, aging skin, normal skin, dry skin … honey loves EVERY SKIN TYPE.
  6. It is healing and helps repair acneic sores and scars.
  7. It’s 100%, absolutely, positively natural, great for your skin, and such a SIMPLE addition to your routine!
How would you say no after reading all that? The one caveat is that it needs to be a make-up free face. It works for me because I use just mascara and eyeliner. (Another secret, I'm completely clueless about make-up.) However, she posted another tip on how to remove eye make-up which was perfect for me. So here's what I do to wash my face at night:
  1.  I pour a dab of cold-pressed extra virgin olive oil into a cotton pad and swipe it over my eyes to remove all the mascara and eyeliner. I love that it doesn't irritate my eyes and I can open my eyes without getting blinded. Bonus: Doing this every night has made my eye area super soft and supple and it has strengthened, thickened, and aided in the growth of my eyelashes.
  2. Optional: Gently tissue off the oil with a soft tissue. I don't do this because I need the moisture and it hasn't impeded my ability to rinse off the wash. It may for you so leave the oil on for your first try and use your judgement for your next attempt.
  3. With slightly damp hands, pour a dab of honey, about under 1/2 tsp, into your hands and rub together. Then massage it into your face all over. All over means all over. I go over my eyes and I make sure to get my jawline because I get quite a few breakouts there.
  4. Let it sit for a little bit. It can be as little as 30 seconds or as long as 5 or 10 minutes. I let mine it while I brush and floss my teeth, so about 5-7 minutes.
  5. Rinse off in warm water. You're done.
Important: The honey can't just be any run-of-the-mill honey. It needs to be as unprocessed as possible, meaning it should be labeled raw. Why? Heat destroys the beneficial properties in honey. Most honey is pasteurized which means it's heated. Raw honey is not heated and therefore retains everything that makes it good. Your best bet is the farmer's market where you can ask the beekeeper how the honey is processed, or a well-stocked grocery store. Just read the label. Since you use so little of it at a time, you can definitely stretch what seems to be a pricy bottle of honey for a far longer time than a pricy tube of top-of-the-line chemically cleanser. Besides, it never ever spoils. If it crystallizes or hardens, just place the bottle in a bowl of warm water to soften. Don't microwave, heat is your enemy! (Right: raw honey I use. Found at HomeGoods of all places!)

I've done this for about two months now. The first couple weeks were magical for me. I loved my skin, it was clearing up and glowed. Then, when I hit the one-month mark, my skin had gotten really dry on my forehead and my skin tone was very ashy and rough. I discovered that I was rinsing with water that was way too hot and that I was washing my face too much. At first, I did the honey-wash every morning and night. Now I just wash my face at nights.

It sounds weird and frankly, dirty, to not wash your face in the morning, but if you think about it, it makes a lot of sense not to. You sleep all night. You're not going out there getting dirt and dust into your pores. You're not eating food. You're not doing anything but resting your face gently against your pillow for hours. So when I started just rinsing my face in warm water followed by a cold water splash in the a.m., my face underwent a transformation. It made a huge difference in the dryness and oil production and now I am much more balanced.

Other tips on the honey-wash: The original method said you could apply the honey directly to a dry face. I hated this because it just pulled at my delicate skin. Adding a bit of water made it go on a lot smoother. Try not to use hot water to rinse, it dries out your skin. I moisturize by smoothing a dab of olive oil around my eyes and my dry spots which are my forehead, around my nostrils, and the corners of my lips. 

Another bonus I've noticed with the honey-wash and olive oil. I had a bit of redness on my nose and cheeks after spending all day in the sun at the beach. There's no solid proof, but I swear on my vegetarian cookbooks that the honey and olive oil (I applied it to the red areas) soothed and dissipated the redness. I've gotten red twice, it seems to have worked twice. Just food for thought. (Hehe, get it?)

I also intersperse my routine with something called the Oil Cleansing Method (OCM,) but as vital as it is, it deserves it's own post so check back soon on my experiences with OCM! Read all about my OCM experience! (image credit)


Would you give this a try? If you do, let me know what you think in the comments!

Thursday, July 5, 2012

Yoga Detox Poses to Help Overindulgence

I'm pretty sure most of you overindulged yesterday amidst loved ones, food, and celebration. I know I have! So when I'm feeling heavier or slower than usual, instead of just trying to slog my way through the day and eating only salads, I turn to yoga to help me get back to my usual self. (image credit)


I focus on specific poses that help detox my body and relax myself. Yoga Journal describes explains how "[t]he heating and twisting sequences designed for [detox] can help move toxins from your tissues through your lymphatic and digestive systems so that they can be eliminated from the body" which is extremely helpful if you've imbibed a bit too much alcohol or ate one too many servings of mayo-laden potato salad.  

So how does the body detox? Kate Hanley of Gaiam Life describes it well: "There are three main systems of the body that play a crucial role in the elimination of wastes — circulatory, digestive and lymph. The circulatory system pumps blood throughout the body, delivering oxygen to and carrying waste products away from cells. The digestive system processes the food we eat, separating nutrients from waste and eliminating anything the body doesn’t need. And the lymphatic system collects intracellular fluid from throughout the body and transports it to the lymph nodes where anything harmful (such as bacteria or other contaminants) can be removed before the lymphatic fluid is returned to the bloodstream." 

Our body is well-set up to do this already, but sometimes we beat it up and we need to offer a helping hand. Most types of vigorous exercise will help rev up your body's detoxification system, but yoga offers a unique method involving stretching and compressing that helps in very specific ways.

I tend to lean towards twists whether it's sitting, laying on my back, or standing in either chair position or lunge position. I guess I can say these are my favorite poses. These poses offer the benefits of improving digestion so I find myself doing a few of these at night before going to bed. Twists are a great example of a compression technique that helps with detoxes. View this page for variations on twists and step-by-step instructions. (image credit)


 Another great detox pose is the downward dog. I know most people hate this, even I dislike it most of the time. However, it's incredibly beneficial to our bodies which is why we find it time and time again in yoga routines. In getting your heart higher than your head, you reverse the gravitational blood flow and shake up the circulation of your blood and lymphatic system. It also slightly tones and strengthened your abs so digestion is improved as well. Click here to read and view a video of step-by-step instructions on how to do the downward dog.

Legs up the wall is another great pose that I've actually have not taken the time to do very much. Gaiam Life explains that this pose "[b]athes the abdomen in fresh blood, stimulating the digestive organs. Soothes the nervous system, allowing your body to shift its attention from warding off stress to daily bodily functions, including detox." It sounds kind of freaky, I know, but never underestimate the power of what simple poses can do for your physical and mental well-being. Click here to read step-by-step instructions on how to do this pose on the left.


What do you do to help your body recover from a day of overindulgence? Would you do these yoga poses? If you do, let me know how you felt afterwards!

Note: I am not a doctor or any type of medical/physical professional. My advice is given because it works for me, not because a doctor or professional said so. If you have any questions about your physical ability, please check with your doctor or physician first for all matters. 

Tuesday, July 3, 2012

The Truth About Salt and How to Salt Food

Okay, this is about salt. Salt is a vital part of cooking. It always has been, it always will, and it always should be, every time. (Image Credit)


I know there will be an argument that some people can't have salt due to high blood pressure. However, according to Health.org, "75 percent of the sodium we consume is hidden in processed foods like tomato sauce, soups, condiments, canned foods and prepared mixes." That's a lot of sodium that we don't have control over. Imagine that, just 15% of the average intake comes from salting at our own discretion. 

The truth is, the amount of salt we add to our dishes can't even reach the level of sodium found in most processed foods. A can of tomato soup can have several times more sodium than the amount you would throw into a pot of homemade soup. Just keep in mind, the recommended healthy daily intake given by LiveStrong.com for sodium is 1,500 mg (2,300 mg being the max) "or less than 600 mg per serving size. For instance, 1 cup of Campbell's split pea soup contains 779 mg of sodium. On the other hand, a 2-cup serving of a homemade split pea soup from "The Mayo Clinic Williams-Sonoma Cookbook" contains 364 mg of sodium."

My point is, when you salt while cooking, use a generous hand and rest easy that you won't be pushing the limits of what's healthy and what's not.

That said, I want to explain how I salt in my cooking. I picked this tip up from one of Michael Symon's cookbook. (You know, back before he became a bacon-and-pork-loving caricature of himself. I'll just leave it at that. Go Zack Bruell!) Anyway, he said that we should salt our food in stages so that in the end, we're not dumping a handful of salt in our pots. "It's too late by then," he says. The dish develops flavors aided by salt throughout the cooking process. And salting your dish after it's hit the dining room table? Way too late.

Salt isn't meant to make food salty. Its properties help draw out the flavors that already exists in the ingredients. It brightens the essence and makes it bolder, more stand out. It also helps melds the ingredients together into a single savory, sweet, tart piquancy. So no, salting your dish isn't to make it salty, it's to make it flavorful. So when you're tasting, you're looking for the taste of what went into the dish. Is it stronger, brighter, or even milder in case of onions, garlic, and other pungent ingredients? (Image Credit)
 
Even though my recipes I've posted so far say to salt to taste somewhere near the end of the method, I wanted to take the time to explain how I do it so you can choose the way you like best. I begin the salting process at the very beginning. Most dishes start with onions and sometimes celery, carrots, and/or peppers. I let the vegetables hit the hot olive oil and give a good shake of salt over it- just enough that it flavors the vegetables in the pan already. After each step or two, I'll give it another shake of salt, being sure to taste it often to make sure the seasoning doesn't become too much.

In the case of using vegetable stock or bullion cubes, I am a little less liberal with my salt since these two ingredients tend to have a bit of sodium already. I make a point to buy low-sodium versions where I find them too.

Just think about it though, you've seen chefs on television demonstrating a recipe. Take the time to notice just how much salt they throw in. It's usually quite a bit, a palmful or handful nearly every time. These chefs know what they're doing and trust me, they're not cooking special occasion dishes, this is how they cook everyday.

The type of salt I use? Sea salt. As for the differences between table, kosher, and sea salt, I'll go over that in another post so you're not completely overwhelmed. I just threw a bunch of information at you already, but I hope that you're looking at how you salt your food a lot differently now. I don't know about you, but I'm suddenly craving a bit of salt right now!

Friday, June 15, 2012

Why Perfection Shouldn't Matter So Much

I thought it'd be fun to do a video showing you how to make a simple chain necklace with a couple charms and a dangling bead. Technology got in the way so I'm still working out some camera glitches, but never fear! I will persevere!

Before I put it up though, I wanted to tell you my... er, unusual method of working and my scant amount of tools. When I first launched Birdcage Bohemia, I had a little quote I liked to use because it described what I do so perfectly.

"Where do you get your inspiration?"
"Poverty and imagination."

Like I said in Meet Beatrice, I had piles of vintage jewelry lying around. I went to the store and bought a cheapie set of jewelry pliers: a chain-nose, a round-nose, and wire-cutters. Super cheap, not high quality or anything. But I tell you, they have served me so well. So well that I'm still using them. Do I wish I had a fancy schmancy set of stainless steel tools with cushy grips and a swank holder for them? Of course, I am human after all. Do I really need it? No, not at all. 


Using vintage jewelry gives me a lot of flexibility. As in, nothing has to be perfect. If it was perfect, it won't look right. Perfection is not the point. I have no patience for it, actually. It's tedious and never looks like it should. Be imperfect! Find those flaws and celebrate them! The jewelry is all the more warm and beautiful for it. Plus, I love how the limitations vintage jewelry give challenged me and my creativity. I am a firm believer that one can create something far more beautiful using finite resources rather than having all the choices in the world laid out at her feet. Wouldn't it be overwhelming to have so many choices? 


I should also mention I am entirely self-taught. I didn't even once pull up a YouTube video to learn a method in the beginning. It wasn't until I randomly picked up a jewelry making book when I realized that some of my technique were rather unorthodox. Did I immediately change what I did? Nah, old habits die hard, and besides, my work hasn't failed me yet so why screw around with a good thing? So if you happen to see me demonstrating something entirely different than what "it should be," please don't blow up my comment box with, "You're wrong! You are so TOTALLY WRONG! I am never buying jewelry from you again!" Just, um, don't buy jewelry and go on your merry way. Thanks.

I guess my point is, some people completely psych themselves out when they want to learn something new or start a project. They research techniques and buy supplies and drive themselves up the wall thinking they're doing it all wrong anyway. In my case, ignorance was complete, total, beautiful bliss. Just do it, half-ass it, learn, make mistakes, and yes, quit if it actually makes you angry. Nothing wrong with that!

Do you have a similar story you want to share? I want to hear it. Let's let people know they can do whatever they like however they like and not be so scared.