Tuesday, August 21, 2012

Tiger Pose Chaturanga

I'm sad to say that I've been slacking on my yoga. Guitar Boy and I have been going on bike rides instead. The weather has been so lovely; it's hard to compare an hour indoors doing yoga with an hour (or more) outdoors biking and enjoying the beautiful Towpath. Yesterday, we managed to go 30 miles, much to my dismay because we were utterly wholly unprepared and were practically starving and shaking with hunger by the end of the ride. Next time, granola bars. Yep.

However, when I'm watching TV while winding down at night, I'll do a couple yoga poses during the commercials. Sometimes, I'll do a few quick Sun Salutations, other times, I'll do some twists and seated stretches. Yet other times, I'll do this modified Tiger Stretch I've seen in some yoga sessions but can't find the official name for it. I consider it a sort of Tiger Stretch chaturanga. Chaturangas are an important part of Sun Salutations. It's a yoga push up. What fun!

This modified Tiger Stretch is a vinyasa that includes an Extended Cat Stretch and a yoga push up, finishing with the Tiger Stretch. It's a great way to stretch out your spine and neck. It also strengthens your arms, most specifically your triceps, and it helps build your core. It's incredibly energizing. After I finish my sequence, my muscles are loose and renewed and I feel relaxed.

1. You begin in tabletop pose, (remember from the Cat-Cow Pose.) Stand on your hand and knees, your wrists below your shoulders and your knees below your hips. Keep your back and neck flat and straight and relax your jaw.


2. Then, shift your weight so it centers over your right knee. Inhale and slowly lift and stretch out your left leg. Reach it up while arching your back, lowering your belly down towards the floor, and looking up. This is the Extended Cat Pose.


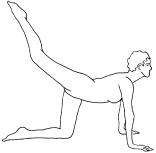
3. Exhale, with your leg still lifted, soften your back slightly and begin to lower into the push up. Slowly, by bending your elbows back towards your hips, not out to the side, lower your chest to the floor in a mini push up. You will now look like a diagonal line with your leg in the air and your chest close to the ground.

4. Inhale, and slowly push yourself back up into the Extended Cat Pose in number 2.

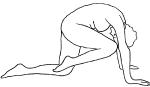
5. Now, exhale and release your leg. Raise your back, bend your knee as you release the leg and bring it under your body close to your forehead. Lower your head to meet it and stretch your spine in the opposite way from the Extended Cat Pose. This is the Tiger Stretch.


6. Come back to the Extended Cat Pose and repeat 2 through 5 two more times on the same leg. Then, return to the table top pose.

7. Repeat the sequence three times on the opposite leg making sure to center your weight on your left knee first before raising your right leg. 

I do this three times on each leg then move into the Child's pose to relax for a minute. If you don't think you can manage the chaturanga, the push up, you can simply skip steps 3 and 4 and go straight into number 5. Do give it a chance though, you might find it a bit enjoyable!


Note: I am not a doctor or any type of medical/physical professional. My advice is given because it works for me, not because a doctor or professional said so. If you have any questions about your physical ability, please check with your doctor or physician first for all matters.  

Photo image source

Friday, August 17, 2012

The Healing Power of Honey

I had the opportunity to test out honey's healing powers. About 5 weeks ago, I scraped my shoulder on the corner of those fire alarm boxes you see in offices and buildings. It wasn't rusted or anything or else I would've ran screaming for the next health center offering tetanus shots. However, I did want to pass out because I don't do well with blood or seeing exposed expanses of white flesh thanks to ultra-sharp metal corners. Anyway, it happened because I bent over to pick up something and got up way too fast.

So I thought this would be a great opportunity to try out all that I've learned about honey and its antibacterial, healing properties. For millenniums, honey has been nothing less than "liquid gold" when it came to health, healing, and happiness. Almost everyone knows that honey was used as embalming fluid in Ancient Egypt, but it doesn't end there. As far as 8,000 years ago, humans have been hunting for honey. (source) Not to mention, for at least 2,700 years that we can find, honey had been used for medical purposes whether through topical application or consumption. (source)

Here are the three valuable properties of honey in terms of healing:
  1. It's hygroscopic, which means when exposed to air, it naturally absorbs moisture in from the air. In treating open wounds, honey is useful as it could help prevent scarring by keeping the skin moist, encourage the growth of new tissues, and allow easy removal of any dressing by preventing dressing from becoming stuck to the skin.
  2. It's antibacterial. Researchers began to document the healing properties of honey in the early part of the 20th century. This ceased with the development of antibiotics but recently the development of resistance to antibiotics has led to a resurgence of interest into the healing properties of honey. The effective antimicrobial agent in honey prohibits the growth of certain bacteria. It contains an enzyme that produces hydrogen peroxide which is believed to be the main reason for the antimicrobial activity of honey. Cuts, abrasions and scalds can be covered in honey to prevent bacteria from entering the wound and promote healing.
  3. It's a source of antioxidants. Honey contains natural antioxidant properties that can destroy biologically destructive chemical agents which have been linked to many diseases such as cancer. Not only could honey's antioxidants help to eliminate free radicals in the body, they are also part of the nutrient supply for growth of new tissue. These precious honey properties help protect the skin under the sun and help the skin to rejuvenate and stay young-looking. (This could explain my inexplicable tan lines in that area, haha!)
If you're squeamish like me, you may not want to look at these photos. They're not dramatic or particularly gory, but sometimes I can get grossed out or lightheaded from the simplest wound. But this is a picture of my scrape a day after it happened:


Here's what I did to naturally heal it. I didn't just stop with honey but also used extra virgin olive oil and cocoa butter*.
  • For the first week, I applied honey to the wound once in the morning and once at night and kept it covered with a bandage. 
  • For the second week, I simultaneously applied honey and extra virgin olive oil to the wound twice daily and continued to keep it covered with a bandage.
  • For the third week, Guitar Boy demanded I let it breathe so the bandage was exiled. I alternately applied olive oil and raw, pure cocoa butter on the wound for the first few days, then just continued applying cocoa butter for the rest.
  • For the fourth week, I applied cocoa butter to it about three times daily. Usually whenever it felt dry.
  • Here I am, on the fifth week. I apply cocoa butter, olive oil, and/or honey whenever I remember which tend to just be once a day at nights. 
*In test treatment of 1st and 2nd degree burns, cocoa butter promoted 100 percent regrowth of new skin by 8 to 9 days after injury, much more quickly than untreated burns. (source)

Guitar Boy says it looks 100 times better and the picture doesn't do it justice. I agree, though the white scar is bothering me. It's a little pink because I haven't been incredibly vigilant about applying sunscreen, but alas, that's the suntanned life for me. However, I recently read somewhere about the application of ginger juice to help turn scarred white skin into normal colored skin. I plan to look into that on a couple of old scars on my legs since I don't feel like my scrape is ready for it.

Here's the picture of it now:


Do you think there's a big improvement? If I never applied the honey, olive oil, and cocoa butter, I would've likely bandaged it for a week, then let it alone for the rest of time. I'm pretty sure it would dry out, scab over, and end up with scarring even worse than what I have now. What do you think?

Wednesday, August 15, 2012

Roasted Vegetable and Mushroom Soup

Everyone knows Kitchen Sink Soup. You just gather up all the vegetables you have that you have too little of to make a real meal or that are on their way out and you dump them into a giant vegetable soup. It's always yummy and perfect for those rainy days where it's too gloomy to consider leaving the house. Well, today was one of those days for me, but mon dieu, I had no such odds and ends veg-wise to make a Kitchen Sink Soup!

All I had were a sweet potato that began to sprout pretty little purple vines, a 12 oz. box of baby bella mushrooms, two scallions, a kohlrabi, and a golden beet. I also had froze some of my homemade vegetable stock that I made over the weekend (instructions coming soon!) I really wanted to try out the stock so I started to formulate an idea.


I roasted all the vegetables, threw in some seasoning, melted down the frozen bag of stock, and pureed them together into a soup, leaving the mushrooms whole. At the last minute, I threw in some spaghetti I had already cooked and kept in the fridge. I expected a meh soup. Nothing to write home about but still edible. When I was done, I was kind of shocked. This soup was actually good. I mean, really good. A nice complex flavor. One vegetable wasn't overpowering the others. Everything melded really well. Best of all, it tasted nice, cozy, and warm. Perfect for this gloomy August day. 

Now, let's hope that these rainy days we've been having this August isn't the norm. I've been angling for another beach day this weekend and the weather better cooperate!

Get together:
  • 1 large sweet potato
  • 1 large golden beet
  • 1 alien-looking kohlrabi (purple or green, it doesn't matter)
  • Salt and pepper to taste
  • 1/4 cup olive ol
  • 2 scallions, coarsely chopped
  • 2 cloves garlic, minced
  • A couple sprigs of oregano or 1/2 generous tsp dried oregano
  • 1/4 cup fresh cilantro
  • 1 to 1 and 1/2 quart of vegetable stock
  • 1 12 oz. box of baby bella mushrooms, sliced
  • 1/2 mushroom bouillon cube (optional) 
  • 1/2 tsp cumin
  • Pinch cayenne pepper
  • Salt to taste
  • 1/2 a lime, juiced
  • Enough spaghetti for 2, prepared
Now, to make 4 servings of soup:
  • Preheat the oven to 425 degrees.
  • Peel and coarsely chop the sweet potato, golden beet, and kohlrabi into 1/2" cubes. Add them to a large roasting pan, salt and pepper generously, and drizzle with olive oil. Roast for 35-40 minutes, tossing the vegetables halfway.
  • Meanwhile, prepare and chop the scallions, garlic, and oregano. Set aside.
  • Clean and slice the baby bella mushrooms.
  • Add the scallions, garlic, and oregano to the roasted vegetables in the last 10 minutes of cooking, tossing well.
  • Remove the roasting pan from the oven but do not turn it off.
  • In a blender, add cilantro and all the vegetables, scraping every last bit out of the pan. Pour in about half a quart of vegetable stock or enough to cover the vegetables. 
  • Move the mushrooms to the roasting pan, season lightly with salt, and drizzle with more oil if needed. Roast in the oven for 20 minutes.
  • While the mushrooms are roasting, puree the vegetables in the blender. Pour the puree into a pot and add more stock to thin it out. Don't make it watery, just make it slightly thick enough to have texture.
  • Add the mushroom bouillon cube and season with cumin, cayenne pepper, and salt. Bring up to a gentle boil over medium heat. Taste and add more salt and pepper if needed.
  • When the mushrooms are roasted, soft with slightly crispy edges, remove from the oven and add to the soup. Squeeze 1/2 a lime over it. My lime was particularly juicy so it was enough, yours may be stingy so use a whole lime if needed.
  • Ladle into individual bowls and add spaghetti whole. Cut up the strands with your spoon and enjoy.
This is super easy to double up to have a larger pot. Even though it sounds labor intensive, it's really not. A short cut I did was roasting the mushrooms with the other vegetables and just picking them out when they were done. It allowed time for the vegetables to slightly cool so I could handle them in the blender. Alternatively, you could add the stock and the vegetables including the cilantro to the pot and use an immersion blender to puree. Then, add in the mushrooms and continue as directed. 


I know it sounds like a weird soup, but it's well worth it. The sweet potato's sweetness played really well with the kohlrabi's cabbagey turnipy flavor and the beet's earthiness. The roasted mushroom added that "final" punctuation that ends the play of flavors on your tongue. The spice from the cayenne pepper, the smokiness from the cumin, and the tang from the lime really helped bring it together. This is definitely a soup I'd make again!

Saturday, August 11, 2012

Holy Kohlrabi!


I have heard of kohlrabi, seen kohlrabi, could probably likely identify it if needed to, but it never occurred to me to actually try it. So when I was at the Farmer's Market last week, I found myself in a talkative mood. Sometimes you just want to get in and get out and woe betide the one who tries to strike up a conversation with you. You don't get that? Maybe it's me.

I was looking for something unusual to bring home. Kale was stricken from the kitchen due to Guitar Boy, ("I don't like the texture," he wailed at me once,) and if I had to look at another zucchini, I might find myself ramming it down someone's throat. Tomatoes, well, yeah, tomatoes are nice, but tomatoes, tomatoes, tomatoes. So my eyes alighted on a deep purple alien ball: "Kohlrabi, .50" as I was purchasing a pint of Italian plums. (You cannot get between me and my plums, so don't even try.)

"Oh, kohlrabi," I said outloud.

"Yes, kohlrabi, you'd love it, it's awesome." The lady at the stand jumped in.

"How do you eat it?"

"You peel it, then slice it thinly, and just sprinkle some salt on top. It's great, you'll love it." She snatched up a spiky royal-colored one and plopped it in my bag. 

"Oh, like a radish?" My moment of enlightenment.

"Yes! Try it and you'll be coming back for more."

"Er... okay, wow, thanks!" and I walked away.

So why wasn't I overly thrilled for being offered a kohlrabi? I have a mild dislike of radishes (understatement.) Being handed this enormous extraterrestrial vegetable that promised to be an oversized, probably more pungent, radish wasn't making me skip for joy.

I find radishes bland with a peppery aftertaste. There's no excitement there. Then, as they sit out, they become slightly rubbery which tended to happen in my household growing up. My mom harbored an unhealthy love for these red and white balls, serving them with buttered bread and salt. Sometimes, she'd throw them into salads. I ate around them, always. She would just have a bunch of slices lying around and nibble at them throughout the day, blech.

But my philosophy is, well, you can't say you hate something without even trying it. So, literally an entire week later, I finally remembered the kohlrabi in my crisper and brought it out to the counter. I stared at it, took a picture or two because, well, it's pretty and unusual so why not. Then, with a peeler, I attacked one side of it. I got the purple peel off, then continuing to use the peeler, I cut out ultra-thin slices. A sprinkle of salt. I ate a piece. Then, another. Then, another. Then I toasted a slice of bread, spread it with a dab of dijon mustard and a kiss of honey and piled loads and loads of sliced kohlrabi on top. Sprinkle of salt, dash of pepper, and a squeeze of lemon.

Holy Kohlrabi!


In my mind, this kohlrabi has proved itself far and beyond the lowly radish. I offer no sorrow for those pitiful things because... kohlrabi.

It turns out there's so much more you can do with kohlrabi other than thinly slice them and dress them with a dusting of salt. I don't know why you want to try because this is kind of perfection on its own, but like one gets sick of zucchini after the upteenth recipe, it's nice to have a backup. You can pickle them, roast them, shave them into salads, turn it into a ceviche, deep fry them, steam them, and probably throw them into a stew with much too thick gravy (guilty.) I can't picture things like cucumber or radishes being cooked (ew, limp, warm radishes,) but kohlrabi has a promise of releasing luscious sweet sugars to caramelize and send the vegetable to a whole new level of food.

I will get around to trying one of the cooked recipes for kohlrabi, but until then, I'm content with a slice of bread and salt. 

By the way, I did go back for more, just like she said.

Wednesday, August 8, 2012

Pieczenia Proziaki: Polish Soda Bread

Pieczenia proziaki is Polish bread made with baking soda rather than yeast. As a result, it's really quick and easy to make with just a very light amount of kneading. It's not even worth getting out the electric mixture for this, it's that simple.


Strangely enough, even though my parents immigrated from Poland, they've never made this when I was growing up. They know of it but not the recipe. It took some stealthy research to come up with one; that and some frequent testing. Though there are several ways to present it, I chose to make the round loaf as opposed to the small round flat breads just because the only directions I could find for it were way too vague. Sadly, I don't speak or read Polish. It's something my mom has berated me forever about though I think it's my parents' fault for not teaching me. Gotta love that old-fashioned Catholic guilt.

Alas, that's the joy of being your parent's child, right? 

Like all breads, it requires your touch and judgement to know the correct proportions. Here are the basic measurements of the ingredients, but as you'll see in the directions, you may need more or less of an ingredient to come out to the same result. You know, bread is like that, but don't let it deter you because this is pretty forgiving no matter what you do.

 Pieczenia Proziaki- Makes one 6" loaf

Gather up:
  • 1 1/2 cup all-purpose flour (I use whole wheat)
  • 1/2 tsp baking soda
  • 1/2 tsp salt
  • 1/2 to 1 cup sour cream
  • 1 tsp honey (or sweetener of your choice: sugar, agave nectar, etc.)
Now, make it:
  • Preheat oven to 425 degrees, prepare a kneading surface by dusting with flour, and prepare a baking pan by dusting with flour as well
  • In a large bowl, sift or whisk together the flour, baking soda, and salt. (I just whisk with a fork.)
  • Create a well in the center of the flour and pour in the sour cream starting with 1/2 cup and honey
  • Using a wooden spatula, slowly mix flour into the sour cream. If it looks a little dry, add a little more sour cream.
  • Once the dough is coming together with about 1/3 to 1/4 of dry flour still loose, dump the dough and flour over the kneading surface and begin to knead gently. Use a light hand and move quickly because unlike yeast, the baking soda can cause the gluten in bread to tighten up too fast and make it tough.
  • Knead to achieve a slightly sticky but elastic dough. You don't want it to be leaving bits of dough on the surface because it's so sticky, but you don't want it to be completely dry. You may need to add more sour cream or more flour as you knead or you may already have the perfect consistency without adding either. (I've been known to use nearly a whole tub of sour cream with good results if that makes you feel better.)
  • Shape into a ball gently and place onto the baking pan. Using a sharp knife, make an X into the surface quickly and decisively. Then, dust the surface with more flour.
  • Bake for 30-40 minutes until golden and the crust is firm. It will sound hollow when tapped. My method is to use two towels to flip the loaf upside down in one hand and to tap the bottom. If it sounds hollow, it's done.
  • Let cool on a rack immediately. 
  • Serve with butter and salted radish slices because well, it's Polish.

Here's why it's forgiving. If you use too much sour cream, it's okay because it'll still taste good. The slices will be extremely moist and a bit crumbly so use this as a bread for soup and stew. We still use it to make peanut butter toast regardless. If you had more flour than sour cream, you'll have firmer slices that can be toasted and topped with your favorite spread. First, just experiment the way you like then go from there. Don't try to aim for a firm or soft bread on your first try. Test it out as is.

If you don't want to use sour cream, you can use whole yogurt, greek yogurt, or even one of those Activia yogurt drinks in a pinch (been there, done that.) Buttermilk and kefir works as well. Here's why regular milk won't work. The fermented dairy has the acid that baking soda needs to help make the bread rise. I'm eager to try this with creme fraiche or mascarapone cheese for a sweet bread because, man, that sounds good. I would have to whip or soften them first so they can blend into the flour well.

This loaf is magical. Why? Because it pretty much disappears when I'm not looking, (glares at Guitar Boy.) He has been known to take enormous bites out of the loaf itself leaving me with weird crooked slices for my freaking peanut butter toast in the morning. (Glares again.) I really need to make several and freeze them next time. I bet you this can be easily doubled for a larger loaf. Just bake for a little longer.

Next time, I'm going to try and add some flax seeds or chopped herbs. Smacznego!

Thursday, August 2, 2012

Oil Cleansing Method: Washing Your Face with Oil, Really!

Okay, you know I greatly enjoy watching people's reaction when I tell them I wash my face with honey, but seeing their reaction when I tell them I occasionally wash my face with oil is even better. It's kind of the same as when you tell them the shirt they just gushed over was bought at Walmart. (I don't condone Walmart so my face would be one of sheer horror.)

I have to say, for as strange and totally-against-all-valid-reason as it is spreading sticky oil across your face, the outcome is amazing. It melts off all your makeup and makes your skin glow. You can literally see the difference in just one day. No, really. Don't believe me? Then, you have to try for yourself.

Again, I discovered this through Crunchy Betty's fabulous website. She's pretty much my go-to for any crunchy procedures or questions I might have. But I wanted to give you my experiences and my own tips on how to wash your face with oil. (image source)

Oil Cleansing Method, otherwise known as OCM:

First, you need three things- castor oil, a carrier oil, and a washcloth.

1) Castor oil is the most important part. It's the oil that does the cleansing. I randomly bought this oil through an Etsy seller called CountrySoapShack when I was trying to make my own shampoo so it was kind of like fate that I had this oil on hand. Otherwise, I've heard that they're pretty easily found in Target and the like in the... wait for it... laxative aisle. Don't run away screaming just yet. The whole point is that we should put things on our skin that's pure enough to ingest right? Right? Just try to get past this and get your precious skin-loving oil. 


2) As for carrier oils, it's what it says, but it also adds extra benefits your skin needs. I currently use extra virgin cold pressed olive oil. Cold pressed is generally the purest type of oil since heat pretty much kills a lot of the beneficial properties. (Remember what I wrote about raw honey? Heat is yo' enemy!) You can also use other oils such as this list I've excerpted from Crunchy Betty below:
  • Jojoba (all skin types, but very desirable for acne-prone skin)
  • Sweet almond (all skin types, especially oily)
  • Grapeseed (all skin types, especially oily)
  • Avocado (dry and aging skin)
  • Sunflower Seed (all skin types)
  • Olive (all skin types)
  • Apricot Kernel (dry, aging, and normal skin)
  • Argan (all skin types, especially aging skin … very pricey)
  • Tamanu (all skin types … very pricey)
Now, I've heard rumors that some people may not have the greatest results with olive oil. Jojoba and grapeseed tend to have the best reputations among OCM fans. Luckily, grapeseed oil can be found next to the olive oil in good grocery stores and jojoba, well, there is the magic of the internet

3) Washcloth. That's self-explanatory. Get yourself a nice and clean one.

Next is to figure out the ratio best for you. Think in thirds and halves. For normal skin, use equal parts castor and carrier oil. For dry skin, use 1/3 castor oil to 2/3 carrier oil. For oily skin, use 2/3 castor oil to 1/3 carrier oil.

I have have normal skin with the exception of a dry T-zone; so I use about 1/2 and 1/2 using slightly less castor oil. You can experiment and figure out the best ratio for yourself.

Now that all that preliminary information is out of the way, onto the actual method:
  1. With a dry face, makeup and all, mix together the castor and carrier oil in your hands. Massage gently onto your face getting every last bit including eyes and jawline and wherever else you have problem areas. Be sure to take at least a minute to massage it all in.
  2. Hang out for 5 minutes. Here, I'll brush and floss and dilly dally around.
  3. Turn on the faucet to the hottest water you can handle. (I know I said heat is your enemy, but here, it's necessary to help remove the oil.) Wet your washcloth well then wring it out so it doesn't drip. Place it over your face and keep it on until it begins to cool.
  4. Optional: repeat two more times.
  5. Using the wet washcloth, gently scrub the oil and makeup off your face, rinsing and rewetting as needed.
  6. Voila. You have a clean and make-up free face!
  7. Moisturizing is generally not necessary but if you feel tight, use some of the carrier oil if you like.
I like doing the washcloth process three times just because... I don't know, it feels right. Holding the hot washcloth over your face opens up your pores so the oil can get in there and clean out the gunk stuck in there. It's really quite exciting because your blackheads all but disappear when you do this. I do moisturize my T-zone still but I think it's because I've gotten lazy and haven't been as vigilant with my ratios and ended up using more castor oil than I should. I just mix a few drops right in my hand each time I do the OCM. 

Now, do you have to do the OCM every day? Some people do. I don't. I use the honey wash every day and maybe once or twice a week, I'll do the OCM. Usually when I know I have to wash my hair the next day because then I can just be sloppy and get the oil as close to my hairline as possible. I'm pretty positive if I committed to the OCM every day, I would have the skin most people would kill for. In between that and the honey wash though, I think it works out for me. 

Also, when you do the OCM, your skin is going to look so good in the morning, you'll feel just dandy not washing it in the a.m. I think it's better that way too: Less washing, more skin health! (image source)

My bathroom is turning into a kitchen pantry right now and I'm loving it. How about you?