Showing posts with label cooking. Show all posts

Thursday, November 22, 2012

Giving of Thanks

Happy Thanksgiving!


I was in Austin, Texas, for two weeks and when I returned home, it was pretty much hit the ground running until today. I'll be posting more often in the upcoming days, I apologize!

Today, I wanted to list a few things I'm thankful for. Sometimes, I get wrapped up in the minor details that I forget to take a step back and look at my life as a whole. 

Yesterday, I got really cranky because I spent the whole day cooking and didn't have a bite to eat. I failed to remember I was cooking for the very first Thanksgiving dinner I was hosting... at my house, with my loved ones. 

  • I'm thankful for having a home- one that's comfortable, beautiful, and in a neighborhood where the neighbors take their leaf blowing seriously.
  • I'm thankful for sharing that home with those that I love- Chanel my cat. Oh, and Guitar Boy too.
  • I'm thankful that my boyfriend can take a good joke.
  • I'm thankful that my parents are around and well enough to cook their version of Thanksgiving to bring over to the house. The more food, the better!
  • I'm thankful for the material things, as superficial as it sounds, because I recognize and appreciate what they've brought to my life: a car that I finally adore, my Macbook because I can write on it and learn from it, and my phone because it keeps me in touch with everyone I love.
  • I'm most especially thankful that I'm alive and experiencing life and that I've finally been able to embrace it.

It's a pretty common list many people share. (Come on, admit it, you're thankful for your phone too!) 

Now to the good stuff. What are you making today? On the menu at my house:

First course: Pumpkin Apple Soup

Entrees: 

  • Turkey-Less Roast with Roasted Vegetables (from Trader Joe's. First time trying it!)
  • A Small Turkey. But we don't care about that. It's for my dad. ("Must have meat! Rawrg!)
Also considered entrees but we can't help ourselves:
  • Dried Fruit and Pecan Rice Pilaf 
  • Mushroom Quiche 
Sides:
  • Garlic-Roasted Mashed Potatoes and Parsnips
  • Apple Bread Stuffing
  • Roasted Mushrooms with Green Beans
  • Rosemary Honey Cranberry Sauce
  • Orange Cranberry Sauce (Don't ask why we have two cranberry sauces.)
  • Cornbread 
Dessert: Chocolate Pumpkin Pie (Of course.)


I'm super-excited and I sincerely hope I remember to take a picture of it all before we devour it. 

Have a happy, joyful, and delicious Thanksgiving!

Sunday, September 9, 2012

Vegetable Scrap Stock

I'm baaaaack. I know it's been a couple of weeks since my last post and that is my own fault. There'sbeen a variety of things going on including a period of time where I did not have my laptop, a move, and a period of time where I've failed to have internet connection. Can I just tell you that having no internet connection is really one of the hardest things to experience? Don't get me wrong; on vacation, not having internet is one of the best things to happen, but when you need to, erm, work, it gets frustrating fast. 

So as my apology and olive branch to those of you who might've been getting annoyed that I haven't been updating, I shall offer up my method for making vegetable stock. It's simple to do and perfect to make for these rainy, cold days we've been experiencing in the good old Cleveland-Akron area. Obviously most of you can't make this immediately because this depends on using vegetable scraps from all those days of making dinner, but it's a great recipe to have on hand once you do decide to start saving all this ends of zucchini and skins of onions.


Vegetable Stock Made From Scraps
The yield varies with the amount of scraps you have.

What you need:

  • Washed vegetable scraps that you've kept in a bag in the freezer. They can be corn cobs, green onion ends and tops, onion skins, carrot peelings, tomato seeds and juice, parsley or other herb stalks/stems, any ends or peelings from tomatoes, zucchini, yellow squash, peppers, celery, asparagus, green beans, kohlrabi, swiss chard or other greens stems, and other produce that's still okay but you're not thrilled about eating it in it's whole.
  • Do not use anything from: beets, eggplants, cabbages, mushrooms*, or anything with a strong, undesirable flavor or color. Note: onions will turn the stock dark so eliminate if you want a clear stock. Also, do not use any produce that is rotten. If you won't eat it in its original state, don't eat it any way else. 
  • Salt, pepper, and various herbs such as parsley or oregano. I've heard rosemary can make it bitter but haven't experienced that myself.
*Do save the mushroom scraps in a separate bag because they make a delicious mushroom stock.

To make the Vegetable Stock:


  • In a large stock pot, pour in the still-frozen vegetable scraps. Fill with enough water to cover.
  • Bring to a rolling boil and season with salt, pepper, and a bit of herbs either dried or fresh. Just throw the fresh in whole since it will be strained. Use a light hand since this is your base for whatever you make it with be it soup, stew, risotto, or whatever else.
  • Lower it to a simmer and let it simmer for about an hour and a half. Longer won't really do much so don't waste your time. Then, let it cool.
  • Cover a colander or a strainer with some cheesecloth or even a double layer of paper towels just in case you weren't able to get all the dirt out when you originally washed the vegetables you got the scraps from. Then, place it over a large bowl and pour the soup through it. You may need more than one bowl, you may not.
  • Squeeze as much water out the vegetable scraps as you can. Either compost or toss them when you're done.
  • Divide and pour the stock into cups, pints, and/or quarts either in ziplock bags or bottles or whatever, and freeze. (Or be like me and pour most of it into a gallon sized ziplock and guesstimate whenever you cook with it.)
  • To use: either let it defrost in the fridge or in a bowl of or under warm water until melted. Use as normal stock.
I filled up an average-sized soup pot to make my first batch of stock. It yielded enough for two soups and a batch of risotto. I was kind of wary about it because I had added green bean ends and they have a very strong flavor. However, it disappeared and all I had was this very fresh-tasting stock that added a depth of flavor to the dishes I made with it. You may taste your stock and think the flavoring is subtle. I certainly did; but when I used it, I realized that homemade stock really was the way to go. Plus, I save a ton of money since I didn't even need to go buy new vegetables for the stock. 

I keep all my scraps in a large ziplock bag in the freezer. Whenever I'm prepping for dinner, I bring the bag out and throw my scraps in it as I go. When I'm done, I put the bag back in the freezer. Easy!

So start saving your scraps and the next time you get a blah type of day, it's the perfect time to start simmering your own easy homemade stock.

Wednesday, August 15, 2012

Roasted Vegetable and Mushroom Soup

Everyone knows Kitchen Sink Soup. You just gather up all the vegetables you have that you have too little of to make a real meal or that are on their way out and you dump them into a giant vegetable soup. It's always yummy and perfect for those rainy days where it's too gloomy to consider leaving the house. Well, today was one of those days for me, but mon dieu, I had no such odds and ends veg-wise to make a Kitchen Sink Soup!

All I had were a sweet potato that began to sprout pretty little purple vines, a 12 oz. box of baby bella mushrooms, two scallions, a kohlrabi, and a golden beet. I also had froze some of my homemade vegetable stock that I made over the weekend (instructions coming soon!) I really wanted to try out the stock so I started to formulate an idea.


I roasted all the vegetables, threw in some seasoning, melted down the frozen bag of stock, and pureed them together into a soup, leaving the mushrooms whole. At the last minute, I threw in some spaghetti I had already cooked and kept in the fridge. I expected a meh soup. Nothing to write home about but still edible. When I was done, I was kind of shocked. This soup was actually good. I mean, really good. A nice complex flavor. One vegetable wasn't overpowering the others. Everything melded really well. Best of all, it tasted nice, cozy, and warm. Perfect for this gloomy August day. 

Now, let's hope that these rainy days we've been having this August isn't the norm. I've been angling for another beach day this weekend and the weather better cooperate!

Get together:
  • 1 large sweet potato
  • 1 large golden beet
  • 1 alien-looking kohlrabi (purple or green, it doesn't matter)
  • Salt and pepper to taste
  • 1/4 cup olive ol
  • 2 scallions, coarsely chopped
  • 2 cloves garlic, minced
  • A couple sprigs of oregano or 1/2 generous tsp dried oregano
  • 1/4 cup fresh cilantro
  • 1 to 1 and 1/2 quart of vegetable stock
  • 1 12 oz. box of baby bella mushrooms, sliced
  • 1/2 mushroom bouillon cube (optional) 
  • 1/2 tsp cumin
  • Pinch cayenne pepper
  • Salt to taste
  • 1/2 a lime, juiced
  • Enough spaghetti for 2, prepared
Now, to make 4 servings of soup:
  • Preheat the oven to 425 degrees.
  • Peel and coarsely chop the sweet potato, golden beet, and kohlrabi into 1/2" cubes. Add them to a large roasting pan, salt and pepper generously, and drizzle with olive oil. Roast for 35-40 minutes, tossing the vegetables halfway.
  • Meanwhile, prepare and chop the scallions, garlic, and oregano. Set aside.
  • Clean and slice the baby bella mushrooms.
  • Add the scallions, garlic, and oregano to the roasted vegetables in the last 10 minutes of cooking, tossing well.
  • Remove the roasting pan from the oven but do not turn it off.
  • In a blender, add cilantro and all the vegetables, scraping every last bit out of the pan. Pour in about half a quart of vegetable stock or enough to cover the vegetables. 
  • Move the mushrooms to the roasting pan, season lightly with salt, and drizzle with more oil if needed. Roast in the oven for 20 minutes.
  • While the mushrooms are roasting, puree the vegetables in the blender. Pour the puree into a pot and add more stock to thin it out. Don't make it watery, just make it slightly thick enough to have texture.
  • Add the mushroom bouillon cube and season with cumin, cayenne pepper, and salt. Bring up to a gentle boil over medium heat. Taste and add more salt and pepper if needed.
  • When the mushrooms are roasted, soft with slightly crispy edges, remove from the oven and add to the soup. Squeeze 1/2 a lime over it. My lime was particularly juicy so it was enough, yours may be stingy so use a whole lime if needed.
  • Ladle into individual bowls and add spaghetti whole. Cut up the strands with your spoon and enjoy.
This is super easy to double up to have a larger pot. Even though it sounds labor intensive, it's really not. A short cut I did was roasting the mushrooms with the other vegetables and just picking them out when they were done. It allowed time for the vegetables to slightly cool so I could handle them in the blender. Alternatively, you could add the stock and the vegetables including the cilantro to the pot and use an immersion blender to puree. Then, add in the mushrooms and continue as directed. 


I know it sounds like a weird soup, but it's well worth it. The sweet potato's sweetness played really well with the kohlrabi's cabbagey turnipy flavor and the beet's earthiness. The roasted mushroom added that "final" punctuation that ends the play of flavors on your tongue. The spice from the cayenne pepper, the smokiness from the cumin, and the tang from the lime really helped bring it together. This is definitely a soup I'd make again!

Saturday, August 11, 2012

Holy Kohlrabi!


I have heard of kohlrabi, seen kohlrabi, could probably likely identify it if needed to, but it never occurred to me to actually try it. So when I was at the Farmer's Market last week, I found myself in a talkative mood. Sometimes you just want to get in and get out and woe betide the one who tries to strike up a conversation with you. You don't get that? Maybe it's me.

I was looking for something unusual to bring home. Kale was stricken from the kitchen due to Guitar Boy, ("I don't like the texture," he wailed at me once,) and if I had to look at another zucchini, I might find myself ramming it down someone's throat. Tomatoes, well, yeah, tomatoes are nice, but tomatoes, tomatoes, tomatoes. So my eyes alighted on a deep purple alien ball: "Kohlrabi, .50" as I was purchasing a pint of Italian plums. (You cannot get between me and my plums, so don't even try.)

"Oh, kohlrabi," I said outloud.

"Yes, kohlrabi, you'd love it, it's awesome." The lady at the stand jumped in.

"How do you eat it?"

"You peel it, then slice it thinly, and just sprinkle some salt on top. It's great, you'll love it." She snatched up a spiky royal-colored one and plopped it in my bag. 

"Oh, like a radish?" My moment of enlightenment.

"Yes! Try it and you'll be coming back for more."

"Er... okay, wow, thanks!" and I walked away.

So why wasn't I overly thrilled for being offered a kohlrabi? I have a mild dislike of radishes (understatement.) Being handed this enormous extraterrestrial vegetable that promised to be an oversized, probably more pungent, radish wasn't making me skip for joy.

I find radishes bland with a peppery aftertaste. There's no excitement there. Then, as they sit out, they become slightly rubbery which tended to happen in my household growing up. My mom harbored an unhealthy love for these red and white balls, serving them with buttered bread and salt. Sometimes, she'd throw them into salads. I ate around them, always. She would just have a bunch of slices lying around and nibble at them throughout the day, blech.

But my philosophy is, well, you can't say you hate something without even trying it. So, literally an entire week later, I finally remembered the kohlrabi in my crisper and brought it out to the counter. I stared at it, took a picture or two because, well, it's pretty and unusual so why not. Then, with a peeler, I attacked one side of it. I got the purple peel off, then continuing to use the peeler, I cut out ultra-thin slices. A sprinkle of salt. I ate a piece. Then, another. Then, another. Then I toasted a slice of bread, spread it with a dab of dijon mustard and a kiss of honey and piled loads and loads of sliced kohlrabi on top. Sprinkle of salt, dash of pepper, and a squeeze of lemon.

Holy Kohlrabi!


In my mind, this kohlrabi has proved itself far and beyond the lowly radish. I offer no sorrow for those pitiful things because... kohlrabi.

It turns out there's so much more you can do with kohlrabi other than thinly slice them and dress them with a dusting of salt. I don't know why you want to try because this is kind of perfection on its own, but like one gets sick of zucchini after the upteenth recipe, it's nice to have a backup. You can pickle them, roast them, shave them into salads, turn it into a ceviche, deep fry them, steam them, and probably throw them into a stew with much too thick gravy (guilty.) I can't picture things like cucumber or radishes being cooked (ew, limp, warm radishes,) but kohlrabi has a promise of releasing luscious sweet sugars to caramelize and send the vegetable to a whole new level of food.

I will get around to trying one of the cooked recipes for kohlrabi, but until then, I'm content with a slice of bread and salt. 

By the way, I did go back for more, just like she said.

Wednesday, August 8, 2012

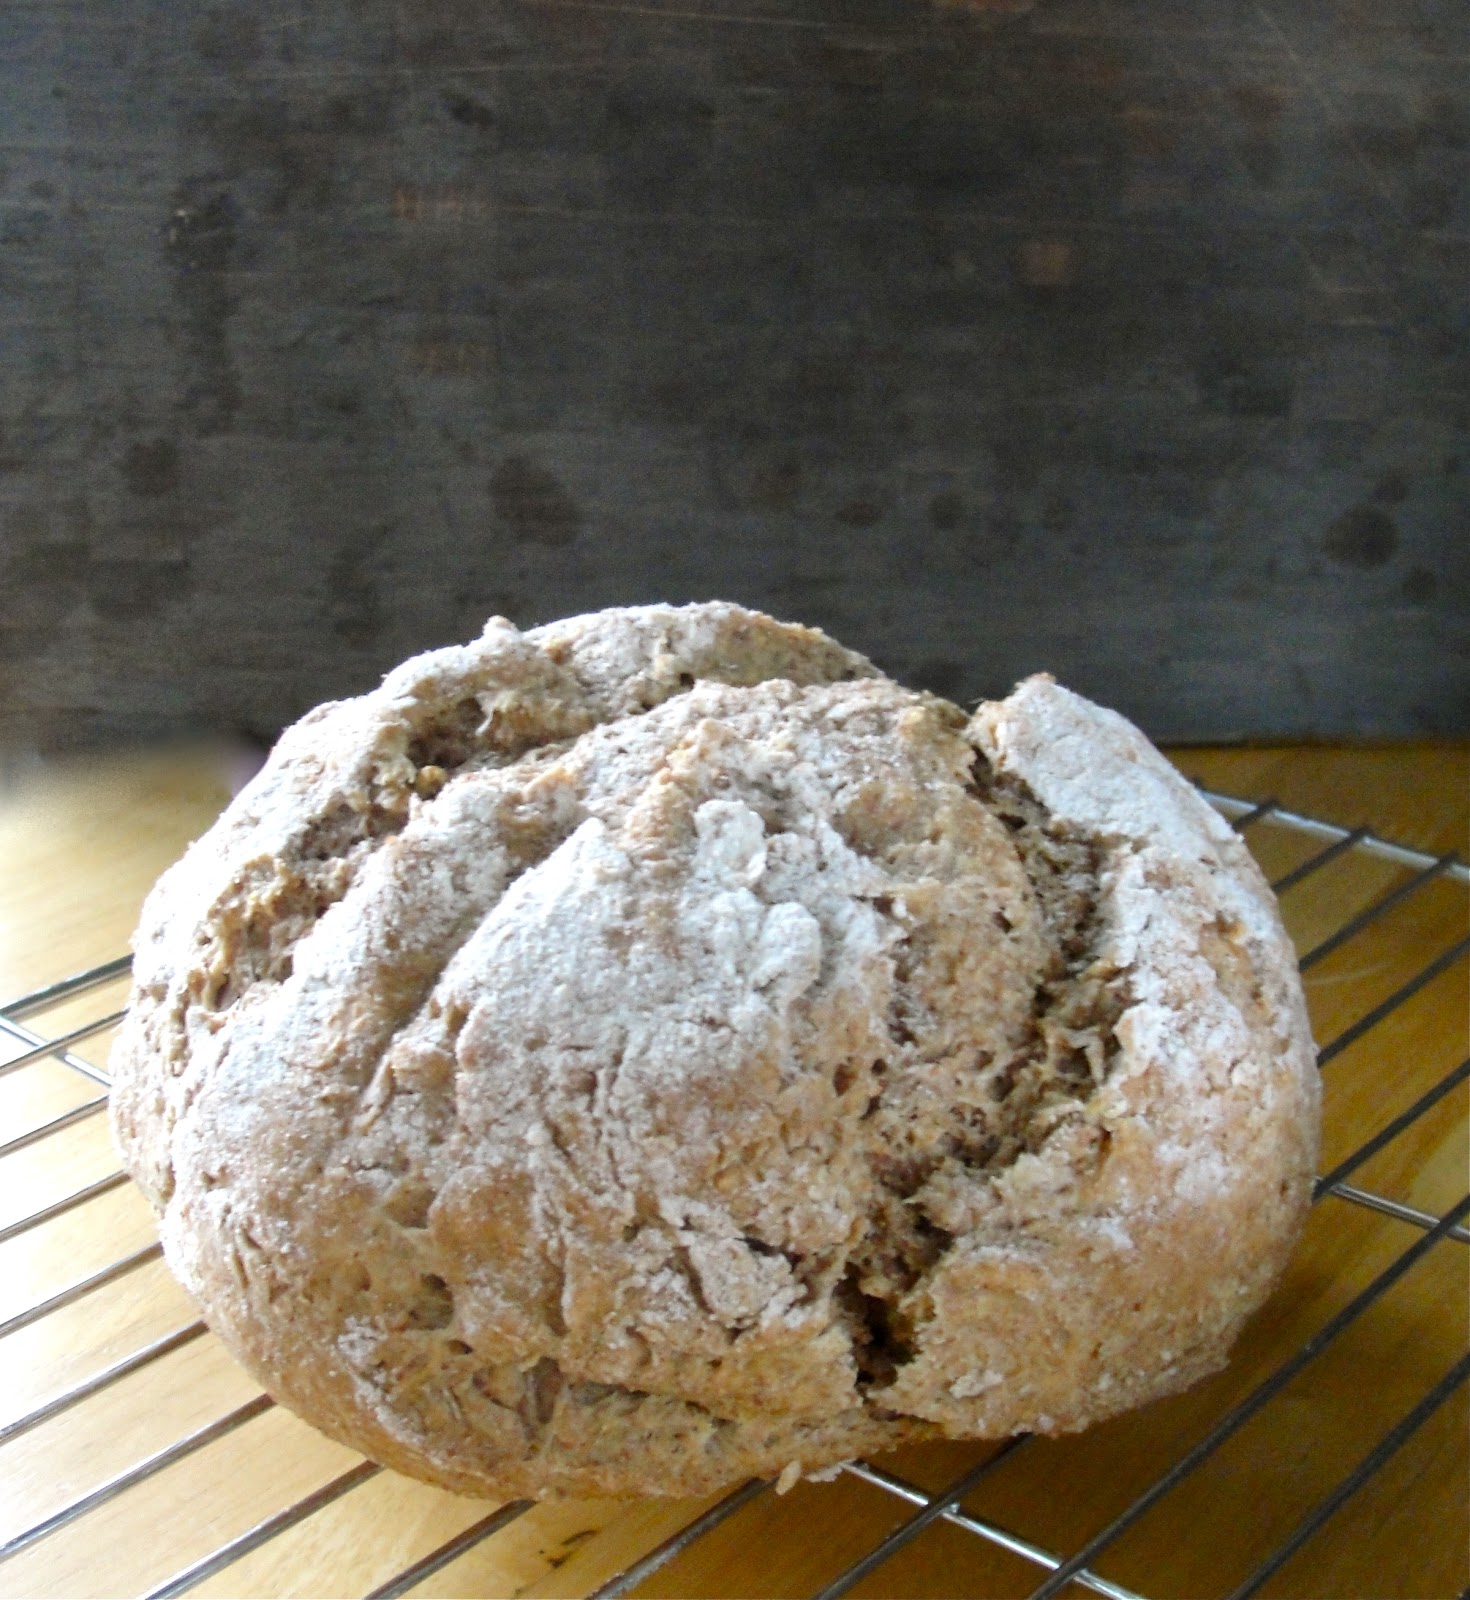
Pieczenia Proziaki: Polish Soda Bread

Pieczenia proziaki is Polish bread made with baking soda rather than yeast. As a result, it's really quick and easy to make with just a very light amount of kneading. It's not even worth getting out the electric mixture for this, it's that simple.


Strangely enough, even though my parents immigrated from Poland, they've never made this when I was growing up. They know of it but not the recipe. It took some stealthy research to come up with one; that and some frequent testing. Though there are several ways to present it, I chose to make the round loaf as opposed to the small round flat breads just because the only directions I could find for it were way too vague. Sadly, I don't speak or read Polish. It's something my mom has berated me forever about though I think it's my parents' fault for not teaching me. Gotta love that old-fashioned Catholic guilt.

Alas, that's the joy of being your parent's child, right? 

Like all breads, it requires your touch and judgement to know the correct proportions. Here are the basic measurements of the ingredients, but as you'll see in the directions, you may need more or less of an ingredient to come out to the same result. You know, bread is like that, but don't let it deter you because this is pretty forgiving no matter what you do.

 Pieczenia Proziaki- Makes one 6" loaf

Gather up:
  • 1 1/2 cup all-purpose flour (I use whole wheat)
  • 1/2 tsp baking soda
  • 1/2 tsp salt
  • 1/2 to 1 cup sour cream
  • 1 tsp honey (or sweetener of your choice: sugar, agave nectar, etc.)
Now, make it:
  • Preheat oven to 425 degrees, prepare a kneading surface by dusting with flour, and prepare a baking pan by dusting with flour as well
  • In a large bowl, sift or whisk together the flour, baking soda, and salt. (I just whisk with a fork.)
  • Create a well in the center of the flour and pour in the sour cream starting with 1/2 cup and honey
  • Using a wooden spatula, slowly mix flour into the sour cream. If it looks a little dry, add a little more sour cream.
  • Once the dough is coming together with about 1/3 to 1/4 of dry flour still loose, dump the dough and flour over the kneading surface and begin to knead gently. Use a light hand and move quickly because unlike yeast, the baking soda can cause the gluten in bread to tighten up too fast and make it tough.
  • Knead to achieve a slightly sticky but elastic dough. You don't want it to be leaving bits of dough on the surface because it's so sticky, but you don't want it to be completely dry. You may need to add more sour cream or more flour as you knead or you may already have the perfect consistency without adding either. (I've been known to use nearly a whole tub of sour cream with good results if that makes you feel better.)
  • Shape into a ball gently and place onto the baking pan. Using a sharp knife, make an X into the surface quickly and decisively. Then, dust the surface with more flour.
  • Bake for 30-40 minutes until golden and the crust is firm. It will sound hollow when tapped. My method is to use two towels to flip the loaf upside down in one hand and to tap the bottom. If it sounds hollow, it's done.
  • Let cool on a rack immediately. 
  • Serve with butter and salted radish slices because well, it's Polish.

Here's why it's forgiving. If you use too much sour cream, it's okay because it'll still taste good. The slices will be extremely moist and a bit crumbly so use this as a bread for soup and stew. We still use it to make peanut butter toast regardless. If you had more flour than sour cream, you'll have firmer slices that can be toasted and topped with your favorite spread. First, just experiment the way you like then go from there. Don't try to aim for a firm or soft bread on your first try. Test it out as is.

If you don't want to use sour cream, you can use whole yogurt, greek yogurt, or even one of those Activia yogurt drinks in a pinch (been there, done that.) Buttermilk and kefir works as well. Here's why regular milk won't work. The fermented dairy has the acid that baking soda needs to help make the bread rise. I'm eager to try this with creme fraiche or mascarapone cheese for a sweet bread because, man, that sounds good. I would have to whip or soften them first so they can blend into the flour well.

This loaf is magical. Why? Because it pretty much disappears when I'm not looking, (glares at Guitar Boy.) He has been known to take enormous bites out of the loaf itself leaving me with weird crooked slices for my freaking peanut butter toast in the morning. (Glares again.) I really need to make several and freeze them next time. I bet you this can be easily doubled for a larger loaf. Just bake for a little longer.

Next time, I'm going to try and add some flax seeds or chopped herbs. Smacznego!

Monday, July 16, 2012

FAQs about Vegetarian Diet and Cooking

I've had a few questions about my diet and the recipes I posted and the way I cook, so I thought I'd answer the most frequently asked ones here so everyone can learn a little bit more about the blog.

What is your diet?

I like to tell people I'm a pescatarian with a vegetarian diet. It means I'll eat seafood and fish once a month or so if even that, but the rest of my meals are vegetarian or vegan (though not on purpose.) I do consume dairy such as milk, cheese, and eggs, but pretty rarely.


What do you prefer to cook with?

Most of my meals turn out to be vegan simply because I choose not to cook with butter, cream, or cheese. I made that choice because I wanted to cut the overall calories and to really amp up the benefits of all the veggies in my dish. Alternatively, I'll use olive oil, citrus fruits, and tons of spices and herbs to flavor and give my dishes a freshness that really, well, can't be beat. A variety of vegetables really punches up the overall meal because you're experiencing so many different flavors on a single plate. 

Are your recipes low in calories or fat? Can I find the ingredients you use?

The recipes I post are healthy, cheap, and easy dishes that anyone can make. Since I cut out a lot of saturated fat found in dairy products, and try to bulk up with vegetables and legumes, they are almost always low in calories and very low in fat aside from the olive oil used in cooking. (Olive oil is a good fat! So is avocados, yum!) Most of my ingredients can be found in your kitchen or at the grocery store and farmer's market with little effort; and since I've been pretty upfront about my tiny budget, they are all affordable. One caveat, since I just cook for myself and Guitar Boy, most of the dishes yield enough for two people, though doubling the recipes should be simple in all cases.

Why should I be a vegetarian?

I'm not here to lecture you about the merits of vegetarianism. Although, I would like to educate you on the points of the diet if you are open to learning more. After all, you can simply close out of my blog if you don't agree with my views. However, I do hope that you will give it a chance if you are not already a vegetarian and see the other side of eating well. As for why I believe someone should be a vegetarian, there's a long, long list that many people like me all agree on. While I did initially stop eating meat because I couldn't bear to know that I was eating a cow or a pig, I learned many more things about the positive effects of vegetarianism that only cemented my belief in it. Other benefits of vegetarianism:
  • Environmentally friendly: It takes significantly less energy to produce a crop of vegetables than it does to raise livestock.
  • Health: It reduces risk of heart disease, stroke, cancer, and extends life length.
  • Affordable: Cutting out meat adds more buck to your bank
  • Reduce toxins in your body from hormones and antibiotics found in livestock.
  • It's easier than ever now to be a vegetarian!
There's tons of more reasons and I will delve deeper into the benefits of vegetarianism individually so more people can at least see the two sides of eating meat and not eating meat. Your best tool for yourself is education. Educate yourself and only then will you be able to make the best choice.

Have you seen Food Inc., Forks over Knives, Food Matters, etc.?

Yes, yes, yes! All wonderful and extremely informative documentaries. Remember what I said about education? This is a great start. If you are interested in learning more about the food industry, Food Inc. is a must. A good follow up to Food Inc. is The Vanishing of the Bees. They both expose the darker sides of the food industry, government involvement (or disinvolvement, rather,) and pesticide use. Forks over Knives is a well-researched, easy-to-watch documentary on the benefits of a plant based diet. Full of scientific studies and carefully researched facts and advice, this is a credible look at plant based diets. Food Matters is another great one if you are still learning more about plant based diets and their effects on diseases. (image credit)


Anything else? If you have any questions for me, feel free to comment below or send an email to me at Beatrice@BirdcageBohemia.com 

I love hearing from people, so don't hesitate to write me!


Tuesday, July 3, 2012

Spicy Lemon Ginger Vegetable Stir Fry

I didn't care about buying a wok when we moved and had to stock our kitchen from scratch. However, Guitar Boy was obsessed with finding one. It had to be a big one and it absolutely had to have a glass lid "so I can see what's cooking inside," he said to me every time we looked at one. Every time. I cared more about getting an immersion blender.

Well, we have a wok thanks to Bed Bath and Beyond and their coupons. And I still don't have an immersion blender. Though the wok has been nice, I still think an immersion blender would've been a better buy, but alas, I make do. (See my tomato soup recipe for my ingenious, if I may say, use of a potato masher.)


Dinner last night was a quick and healthy stir fry. Typically we use vegetarian oyster and mushroom sauce or just a run-of-the-mill stir fry sauce from the Asian market but they can be packed with sodium, sugar, and god knows what else. I wanted to avoid using them this time just because we had been eating pretty crappy the day before (read: two giant doughnuts each and pizza and cheese and much too sweet Ohio wine and crap and more crap and more crap.) So I really amped up the spices and flavors in this one to make up for the lack of that ooey gooey deliciously overly processed sauce.

Also, you don't absolutely need a wok for this recipe. Woks are nice for having a ton of surface area that can cook all the vegetables all at once, but a large skillet over high heat will do just as well.

Also, again, you can use your favorite vegetables. I used whatever I had on hand, but you can switch it up with your favorite add-ins. The ingredients in bold is what makes up the flavor and sauce so they shouldn't be swapped out.


Get together for 2 main dish or 4 side dish servings:
  • 1 onion, sliced thinly
  • 3 carrots, sliced in half-moons
  • 1 large Hungarian sweet pepper, chopped coarsely
  • 1 small (8 oz?) box of sliced baby bella mushrooms
  • Splash of dry white or rice wine (optional)
  • 2 tomatoes, chopped coarsely
  • 3/4 to 1 tbsp ginger, minced
  • 3/4 to 1 tbsp garlic, minced
  • Pinch or dash or heaping spoonful of cayenne pepper (whatever floats your boat)
  • 1/2 lb swiss chard, rolled up and sliced into 1/2 inch strips
  • Enough Rice or Pad Thai noodles for two large servings, prepared 
  • 2 or 3 packets or 2 or 3 tbsp of your favorite soy sauce (add more or less to your preference)
  • 1 lemon, juiced
  • 5 or 6 large basil leaves, torn
  • Salt to taste
Other vegetables you can use: broccoli, peas, corn, snow peas, water chestnuts (not a veg, I know,) bell peppers, red onions, shallots, cauliflower, kale, collard greens, napa cabbage, broccolini, portobella mushrooms, celery, eggplant (Japanese or traditional,) and anything else that strikes your fancy. Just eyeball the amount and go for it.

And to make it:

It's best to have everything all chopped and prepared in advance because stirfry cooking is over high heat and fast.
  • Prepare the noodles according to package directions.
  • Heat up sesame oil over medium high to high heat in the wok. Peanut and canola oil work too. Do not use olive oil. Add in the onions, carrots, and pepper and let cook a minute or two until soft and onions become slightly translucent. Then, throw in the mushrooms and stir and let cook for a few more minutes.
  • Optional: Add a splash of dry white or rice wine to deglaze or just flavor, let it reduce down.
  • Add in the tomatoes, ginger, garlic, cayenne pepper, and swiss chard and let it simmer and cook down slightly- about 3 minutes.
  • Continue cooking until the swiss chard (or your favorite green) is tender, tasting and adding more cayenne pepper if desired. 
  • Lower the heat to low, stir in the noodles and season with soy sauce and lemon juice starting with 1/2 a lemon. Taste and add more lemon juice, soy sauce and/or salt if needed. (Soy sauce has sodium so salt by tasting.)
  • Sprinkle basil over the top and serve!
 Do you make stir fry a lot? What's your go-to set of ingredients? When we're low on prep time, we turn to frozen broccoli, peas, and mixed vegetables to make a fast and healthy dinner.


The Truth About Salt and How to Salt Food

Okay, this is about salt. Salt is a vital part of cooking. It always has been, it always will, and it always should be, every time. (Image Credit)


I know there will be an argument that some people can't have salt due to high blood pressure. However, according to Health.org, "75 percent of the sodium we consume is hidden in processed foods like tomato sauce, soups, condiments, canned foods and prepared mixes." That's a lot of sodium that we don't have control over. Imagine that, just 15% of the average intake comes from salting at our own discretion. 

The truth is, the amount of salt we add to our dishes can't even reach the level of sodium found in most processed foods. A can of tomato soup can have several times more sodium than the amount you would throw into a pot of homemade soup. Just keep in mind, the recommended healthy daily intake given by LiveStrong.com for sodium is 1,500 mg (2,300 mg being the max) "or less than 600 mg per serving size. For instance, 1 cup of Campbell's split pea soup contains 779 mg of sodium. On the other hand, a 2-cup serving of a homemade split pea soup from "The Mayo Clinic Williams-Sonoma Cookbook" contains 364 mg of sodium."

My point is, when you salt while cooking, use a generous hand and rest easy that you won't be pushing the limits of what's healthy and what's not.

That said, I want to explain how I salt in my cooking. I picked this tip up from one of Michael Symon's cookbook. (You know, back before he became a bacon-and-pork-loving caricature of himself. I'll just leave it at that. Go Zack Bruell!) Anyway, he said that we should salt our food in stages so that in the end, we're not dumping a handful of salt in our pots. "It's too late by then," he says. The dish develops flavors aided by salt throughout the cooking process. And salting your dish after it's hit the dining room table? Way too late.

Salt isn't meant to make food salty. Its properties help draw out the flavors that already exists in the ingredients. It brightens the essence and makes it bolder, more stand out. It also helps melds the ingredients together into a single savory, sweet, tart piquancy. So no, salting your dish isn't to make it salty, it's to make it flavorful. So when you're tasting, you're looking for the taste of what went into the dish. Is it stronger, brighter, or even milder in case of onions, garlic, and other pungent ingredients? (Image Credit)
 
Even though my recipes I've posted so far say to salt to taste somewhere near the end of the method, I wanted to take the time to explain how I do it so you can choose the way you like best. I begin the salting process at the very beginning. Most dishes start with onions and sometimes celery, carrots, and/or peppers. I let the vegetables hit the hot olive oil and give a good shake of salt over it- just enough that it flavors the vegetables in the pan already. After each step or two, I'll give it another shake of salt, being sure to taste it often to make sure the seasoning doesn't become too much.

In the case of using vegetable stock or bullion cubes, I am a little less liberal with my salt since these two ingredients tend to have a bit of sodium already. I make a point to buy low-sodium versions where I find them too.

Just think about it though, you've seen chefs on television demonstrating a recipe. Take the time to notice just how much salt they throw in. It's usually quite a bit, a palmful or handful nearly every time. These chefs know what they're doing and trust me, they're not cooking special occasion dishes, this is how they cook everyday.

The type of salt I use? Sea salt. As for the differences between table, kosher, and sea salt, I'll go over that in another post so you're not completely overwhelmed. I just threw a bunch of information at you already, but I hope that you're looking at how you salt your food a lot differently now. I don't know about you, but I'm suddenly craving a bit of salt right now!